Search This Blog

Sunday, September 28, 2014

Why Lino's Sticky Widget is the Best.


Yay me, I've just finished writing my second book, Mud, Sweat, & Tears, because, ya know, I can totally do that.  Now that that is over and out of the way, I want to share, with pretty much anyone that will hold still long enough to listen, this awesome and FREE virtual cork board app.  In my pseudo-professional opinion, this is the way to go when trying to organize your research and story ideas.  

During the hours when I was supposed to be writing, I, of course, spent my time procrastinating on Pinterest.  I was searching for tips and tidbits, ideas about how to make your writing better, how to get organized, how to make the whole process easier.  (Instead of actually writing.)  There were countless pins touting the benefits of Scrivener, how its cork board made organizing your story board so much easier and how you can see everything laid out in front of you.  And it's true, you can use Scrivener to lay out your entire novel in scenes, which you can then move around at will.  There are another twenty to thirty benefits to Scrivener, or so I've read, but I tried the free-trial and decided that I didn't want to use something that required me to watch multiple YouTube videos before I could figure out how to use it.  Ain't nobody got time for that.  But I liked the idea of a cork board...

So I went in search of an online cork board, because I didn't want to waste paper printing stuff out and putting it in a tabbed notebook or pinning it to a real cork board.  I keep a notebook next to my bed to jot down story ideas or bits of dialogue that I come up with while I'm lying in bed,  but I don't want to carry one with me all of the time.  I already take a phone with me, and with lino as an app on my phone, I can take that cork board along too.  Did I mention that it's free?

Let me show you how it works:


I have a sticky note widget on my home laptop, which is what I used for my first book.  I wrote down information about the characters, plot ideas, and twists, but I quickly ran out of room.  Plus, if someone, say, your child, decides it's in their way, they x out of the sticky, and you lose that information forever.  Not so with lino.  It's safely tucked away on a server, far from your children and their button clicking ways.

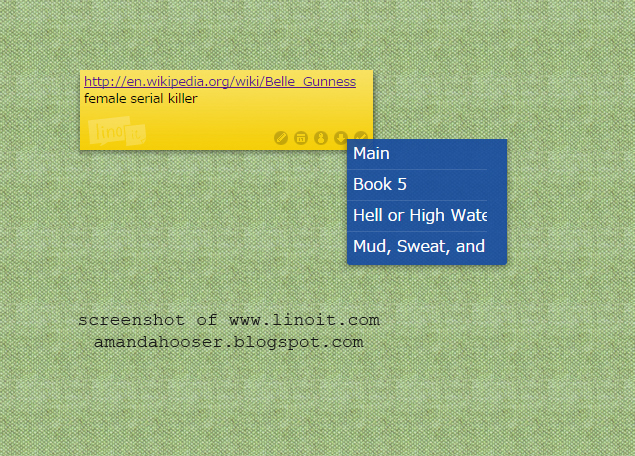
You can choose from several background colors if you want to personalize your boards.  While the first board they give you will be titled MAIN, you can choose to name your other boards whatever you like.  When you add a sticky, it will look like the picture below.  Make a note, add a link if you like, tag it, or change the color of the sticky to fit into whatever color-coded plan you want to use.  Again, it's customizable. 


You can create a board for each book/paper/short story/screenplay...whatever, and there is no limit to the number of boards you can create.  Are you writing a series and want the same information shared across several boards?  You click the down arrow button on the bottom of the stick and choose which board you want to copy it to.  It's that easy.


I have multiple ideas going around in circles in my head at any given time, so this is the perfect way to do research on something that I may only be planning to write in the future.  This sort of research is normally done while I'm supposed to be writing something else, which is also called procrastination.  As you can see below, I've added pictures and then labeled each picture with a link to the site the picture was found.  I'm not ready to read all of those sites right now, but I'll know where to find it when I am.


And a shot of another book that I'll start writing for Nanowrimo in November.  I've put up pictures of random people I've found on the internet for my character references, and then slapped stickys around them as I've thought of their backstories.


You can add it to your computer, your tablet, or your phone, and take it with you anywhere, for free.  So the next time you're in Wal-Mart and think to yourself, 'That loser is going into a book," you can just pretend that your checking your grocery list app, while you're actually updating your board with characteristics of 'weird guy #10'... or whatever.


Sunday, March 9, 2014

Colored Easter Deviled Eggs


Well, this is another idea I saw on Pinterest, and let's face it, Easter projects on Pinterest range from super elaborate to gluing some Peeps to cardboard.  But this is one project I saw, and well, it seemed like everyone was posting different pics of it, and I thought, 'Hey, I can totally do that!"  And guess what?  It was super easy.  Since it involved eggs, I thought I'd incorporate another Pinterest project - baking eggs in a muffin tin.  

Baked Hard-Boiled Eggs

You will need:
Eggs - 6,12,18  however many eggs you need for the number of people you're feeding.
Muffin tin and an oven

Honestly, I am the worst egg boiler on earth.  I've read so many different directions for how to boil an egg that I never remember which one actually works, then they're either under-boiled or have that green ring around them.  Either way you have to have a big pot of boiling water, the steam, trying not to splash boiling water on you, I just don't like doing it.  I like this method for it's simplicity and I've tried a few variations since this first attempt.  

The method?  Place eggs in muffin tin wells, bake at 325 degrees for half an hour.  If you find your eggs have burned spots on the whites, try putting cupcake liners in the tins first to give the eggs a little more protection.  I'm actually considering buying silicone cupcake liners just for this purpose.  (I'm on a diet, no cupcakes for me!)

There are thousands of blog posts about how to bake a hard-boiled egg, so I don't kid myself that I'm imparting any new wisdom on you, but still a little freaky to see what they look like when they're done.  The oozey stuff washes right off, don't worry about that if you were planning on dying the eggs for an Easter egg hunt.  


Drop them into a bowl of ice water, give them a few minutes to cool off so you don't burn your fingers, then start peeling.  I've found peeling the shells off takes a third less time on average than actually boiling them.  I swear I spent half an hour peeling a dozen eggs one year because they were fresh and ended up with terribly ugly eggs.  This is what the burn spots look like, they weren't as bad when I used cupcake liners, and the burned area peeled right off, so you can't see them in the finished product, you just see a little divot. 


The second best part, after easy peeling, is no green/grey ring around the yolk!


Then comes the fun part...

Dying Your Egg Whites


Your options here are only limited by the food coloring you have on hand.  I have Wilton Gels and put them to good use.  

You will need:
Hard boiled egg whites
Plastic Zip-Lock bags, sandwich size is fine
Food Coloring
Rubber gloves - unless you don't mind having multi-colored fingers

Pop those yolks into the bowl where you'll be making the deviled part of your deviled eggs and start throwing the whites into plastic baggies.  You just need enough water in each baggy to cover the egg whites, and since I was using gel color, I dipped a toothpick into the gel and smeared it on the inside of the bag, where I broke it up and mixed it with the water with my fingers after the bag had been closed.  You have options here, the more food coloring you use, the faster the dye works, and the longer you leave the whites in the bags, the deeper the color.  I was going for bold, not pastels, so I left them in the bags for about twenty minutes.  Since they're in plastic bags it is really easy to check your color saturation, just grab the bag and slide an egg half above the water line to see what color it really is.


Once you've reached the desired color effect, lay them on a double layer (or even a triple layer if your counter tops stain easily) of paper towels to dry.  I would wait until you have everything laid out and drying before starting on your yolks, as that will give them time to set.  WARNING - if you're not wearing gloves at this point, you're going to have colorful fingers.  Wash your hands off between bags of color, or you'll be transferring the dye on your fingertips and have some weird spots.  Unless you're into weird spots, then knock yourself out.


After the egg whites are dry to the touch, fill them with your yolk mixture.  Deviled eggs are an individual thing, and I don't even measure for it, I just throw mayo, yellow mustard, and vinegar into the bowl until it tastes right, add salt and then stick it into a plastic bag.  I don't have professional icing bags, but since I'm usually traveling with the deviled eggs, I load up a Tupperware container with the egg whites, and a half gallon Zip-Lock bag with an icing coupler in the bottom corner.  (If you try this method, make sure you stick that coupler in there BEFORE you fill it with the yolk mixture)  When I get to my destination, I cut the corner off at the coupler and attach an icing tip to pipe into the eggs. Wilton tip #32 to be exact.  I think it makes for a more finished product.  Also, I would advise that if you're traveling with the dyed eggs, to separate them with paper towels or wax paper to keep the color from bleeding into one another.

Place on a pretty plate, and VOILA!  Happy Easter!


Bonus Tip: 

Remember that yellow and blue makes green, and yellow and red make orange.  So if you don't want plain yellow centers you can get creative with the yolks too.  I made white eggs with green yolks for Christmas one year, don't be afraid to try something new!

Sunday, December 22, 2013

Apple Pie Moonshine

If, for some reason, you've found yourself the proud owner of a quart of moonshine and think to yourself, 'Gee, I wonder if my lawn mower will run on this stuff?' do your tongue a favor and make it into Apple Pie.

I found a basic recipe on the internet, from moonshineheritage.com and updated it a little.

What you'll need:
1 quart or 1 liter - moonshine or grain alcohol.  You can use Everclear, but if it's not at least 190 proof it's not going to be as strong.  Yes, a quart is less than a liter - a liter is 1.056 U.S. quarts.  If this difference bothers you, take a swig - there, now it's even.  A quart jar is probably what you have if you personally know the maker of the moonshine, a liter may be your option if you're buying it commercially, if that's even legal in your state.  It probably isn't, but I'm not going to judge how and where you obtain your moonshine.
1 gallon - apple juice - yes, I said GALLON
1 gallon - apple cider - yes, there's a difference.  If you don't see something labeled as cider in the grocery store (it's usually kept refrigerated) look for Simply Apple over in the orange juice section, if it's cloudy, it's cider.
2 1/2 cups - white sugar (you may want to substitute that last half a cup with brown sugar, I haven't tried it yet, but I plan on it)
24 - cinnamon Jolly Ranchers - umm, unwrapped, of course.
1/4 tsp. - allspice (if you have Apple Pie Spice, that'll work too)
1 tsp - vanilla  (if you want more than that after you taste it, feel free to add more)
at least an 8 qt stock pot, preferably a 10 qt.
9 - 1 quart mason jars


Keep in mind, that you're combining two gallons of stuff together, so you're going to need a minimum of an 8 qt. stock pot.  That 5 qt. crockpot isn't going to work unless you're halving the recipe.  Combine the apple juice, apple cider, sugar, and jolly ranchers together in the pan. Sprinkle your allspice on top, stir, and bring to a boil.  The Jolly Ranchers are going to stick to the bottom, you'll have to do a fancy little stir/scrape maneuver to keep popping them off the bottom until they melt.  Once it boils and you're certain all of the sugar and candy have melted, turn off the stove.  Add your vanilla flavoring, stir it in, and then let the mixture sit for a while to cool off.  This takes a few hours.  Once it's cool, you can add the alcohol.  This can be tricky if you only have an 8 qt pot, because it's already full.  Basically I poured the alcohol into the jars, making it as even as I could, then filled them all the rest of the way with the juice mixture.  You can enjoy it immediately, but some of the harshness of the moonshine is smoothed out if you let it sit in the fridge for a few weeks.  Remember, keep it refrigerated - just because it's in a Mason jar doesn't mean you really 'canned' it, with the amount of sugar in it bacteria will still grow if you leave it out at room temperature.

So go forth my lovelies, and make some apple pie your friends will kill for, just don't let it knock you on your butt - it's sneaky like that.  Tie a ribbon around a jar and give it away for Christmas, your friends will actually want this gift.  Whatever you do, DON'T DRINK AND DRIVE! Drink and nap, like normal people.


Saturday, December 14, 2013

I wrote a book...

If you'll recall, my last post was about Nanowrimo and that I'd finally broken 50,000 words.  Well, in the last two weeks I've taken that bundle of words and disjointed dialogue, shaped it, molded it, and turned it into a book.  Playing Dirt, which can now be purchased as an Ebook on Amazon.com.


How did that happen?  Well, mostly with Pinterest.   If you're as old as I am (35) then you may recall The Little, Brown Handbook where you had to search out all of your questions for punctuation and grammar when writing a story or research paper.  This is what we had, there was no Google, and generally my teachers would never answer a question unless you could not find the answer in the Handbook.  It was frustrating.  Now though, there are some fabulous blogs and online articles about proper editing, and I'd like to take a moment and post some links for some of the best ones I found in my search.  No, I can't say that I hit the pinnacle of grammatical perfection, I'm sure there are still many errors, but it is definitely better than it was when I stopped at the end of November. 

First, The Editor's Blog.  As I was doing what I thought was my final edit, I had a vague niggling at the back of my mind about lower case letters starting after dialogue, but I couldn't remember why, or when I would use it.  This saved me, well, it caused me another run through of editing because I was doing it all wrong, but it was very clear and easy to understand.

Second, Writer's Digest: What To Look For When Editing Your Manuscript.  I loved this article, and it really helped me focus on the things I needed to look for.  Especially rule# 5 - The Audible Read.  If it doesn't flow well when you're reading it aloud, then you've screwed something up.  Go fix it.

This, from The Write Life.  Actually, everything from The Write Life, it's an excellent blog and I really suggest reading a few articles before you get started.


And finally, if you're going to publish to Amazon Kindle, you really need to download the free book from Amazon about how to format your work so that it will work on the Kindle platform, Building Your Book For Kindle. 

If you're really bored, or just want to waste more time while you're supposed to be writing something, I've got a whole bunch of tips, funny writing ecards, and other blog links on my 'Writing' Pinterest board.  http://www.pinterest.com/manderbet/writing/

Go forth, and create!

Thursday, November 28, 2013

NANOWRIMO - National Novel Writing Month

Okay, so how's this for I Can Totally Do That?  Write a novel in a month?  Sure, why not? Challenge accepted.


So a friend sends me a message in October saying, hey, do you want to try nanowrimo with me?  I, of course respond, "What the heck is that? Some sort of pokemon crap?"

Well, the short answer - no.

It is now November 28th, so I'm not going to make it, but thought I'd let you all know of the effort I gave it. First, let me explain the challenge.  The month of November is THE month in question, you, the writer are challenged to write 50,000 words during this 30 day period.  You update your word count yourself, occasionally pasting the entirety of your writing into a little box; it doesn't save you novel, just verifies the word count, and then shows you your stats - how many words a day you're averaging, how many you need to average to get done, when you are really going to get done if you keep writing as slow as you are now...stuff like that.

You get weekly updates from published writers with hints and tips, which is really nice when you're in week 2 thinking, WHHHHYYYYY am I subjecting myself to this, I'm never going to write anything that anyone will ever want to read.   Waaahhhhhh....  They encourage to go get more coffee and keep plugging away.  You also get to see a breakdown of your region, and they post on their own forums.  The Huntington, WV group has it's own fabulous Facebook page to encourage one another and meet for 'write-ins' which I've never done because bringing children along would defeat the purpose.  All in all, I really recommend it.  It has been fun.  I'm only at 36k words and a little over halfway done with my archaeologist/cop romance novel, but by golly I AM going to finish it.  (nanowrimo thinks by Dec. 11th at the rate I'm going)

Now, by finish, I don't mean ready to upload to Amazon Self Publishing, I mean, the first draft will be written.  I have whole chunks of this that are just dialogue, run on sentences, duplicated phrasing (my biggest pet peeve of 50 Shades is the repetitiveness, okay, he has LONG fingers, we get it already), but the story will be written, the rest is just editing....and re-editing...and then having someone who actually knows how to edit, edit it.  THEN it will be ready.

If you're interested in my effort, check out Chapter 1:
Playing Dirty


And if you're interested in being challenged to write a novel in a month (next November), here's the link.
nanowrimo.org

I hope you enjoy, and I'll let y'all know if I ever finish editing it! ;)

Friday, October 25, 2013

Quick and Easy Costume 'Skin'


 So you want to be a zombie for Halloween, and you've watched every episode of FaceOff but still have no idea how to pull it off.  Let me show you how I faked it.

You will need:
Rubber Cement
Tissues
Acrylic Craft Paint - red, black, white, green, and the closest color you can find to your own skin tone.
A paintbrush is helpful, but you can use the corner of a paper towel or even your finger.
Baby oil (to remove the rubber cement)
Dish washing liquid (to remove the baby oil)
Corn starch, flour, or talc

First and foremost, if you have sensitive skin, I don't advise trying this.  It takes a lot of effort and scrubbing to get the rubber cement back off your skin, so if you think any of the above ingredients may break you out in hives, don't risk it.  (Unless it adds to your costume, ya know, your choice)  Also, if you have a lot of hair where you plan on applying this, shave it off now.  Trust me, you'll thank me later.

Yes, it looks like snot covered tissues.  Yum.
Decide where you want your 'wound' to be placed, then slap some rubber cement on it. As you smear it on, keep in mind that a thin coat is best because even thick globs will flatten out as it dries, so you won't get more texture just a longer drying time.  Let the first layer dry, this takes about 3 or 4 minutes.  Then rip your tissue into strips and lay them down to create the 'edges' of the wound.  Brush over the tissue strips with rubber cement, making sure you get the outside edges laid down flat, you want the inner edges to stick up a little.  If it's not perfect, don't worry, you're going to paint over it anyway, and well, chances are, wherever you're going will be dark so no one will notice.

Then paint.  I painted the tissue the color I found closest to my skin color, then using the same brush (no need to clean it) mixed some red and black together and laid that down the middle as 'gore'.   When I was satisfied with that, I mixed some more of the flesh tone with the red and dabbed it on with my fingers to make a 'bruised' area around the wound, like it's been festering; some black vein marks would be very acceptable.  Since I was going as a zombie, I mixed some green and white with my fingers and kind of smeared it around on the other areas of my arms, to give my skin a greenish tint.  This whole process took about 15 minutes from start to finish.  You could get much more involved with it, but if you're looking for something quick, this works really well.


The hardest part of this whole process - getting it back off.  The paint is acrylic, it will wash right off with water (not rain proof, I'll warn you now!) but the rubber cement, not so much.  Baby oil will dissolve the cement and it makes a lovely rubbery/oily goo.  I recommend using some dish soap to remove most of the oil, then throw a handful of corn starch on it.  Flour or talcum powder would work too, you just need something that will soak up the rest of the oil.  Then, rub thoroughly.  It should peel off pretty easily after that. 
Almost as good as waxing, you didn't need all those useless hairs anyway.

Monday, September 30, 2013

Zebra-fied Corkboard


Yes, even a plain, boring $10 Walmart cork board can be zebra-fied.  I think it's necessary for a 10 year old girl to be able to pin stuff up on something other than the drywall, and let's face it, a big brown rectangle isn't going to fit into the 'decor'.  And so began my shopping trip.

You will need:
*A corkboard, whatever size you want, I used a 2'x3' that I found for $9.97 at Wal-Mart.  I considered just buying cork tiles and making one myself, but honestly it was cheaper to just buy the board already in a frame.  
*A can of white or pink spray paint.  I used white, but you could do pink with zebra stripes if that's your thing.
*Black acrylic paint.
*Trim - something fuzzy, sparkly, shiny....your options are endless.
*A hot glue gun, and ya know, the glue sticks for it.
*A spoon. 

Step 1.)  Brush any loose dust and debris from the corkboard and go spray paint it.  I used an entire can of paint on this board, so if you go bigger you may want to buy two cans.  Even so, you can see that there are areas that could have been covered better, but honestly she's going to have it covered in artwork and magazine clippings within 10 minutes of me hanging it up, so I wasn't concerned about splotches.  Again, my standard warning when using spray paint, protect your area from overspray, and make sure you're in a well ventilated area.  If you start singing show-tunes five minutes in, you may need some fresh air.  Could you use white acrylic paint and a brush? Probably, but you'd want to prime it first, and ain't nobody got time for that.

See how uneven it is? The cork sucks the paint up immediately.  Luckily it doesn't need to be perfect,
you won't notice once you paint the zebra stripes on.

Step 2.)  Find a reference for your zebra stripes.  Google is wonderful thing and every time I use it I wonder how I made it through high school without it.  Find something you like and try to copy it; it's very hard to screw up zebra stripes.  Just try to keep your lines smooth and not straight, if that makes any sense.  You can create tiny little stripes or big bold stripes, it's a very personal thing.  Alternately, you can let your child draw/paint their own stripes, and if it looks weird you can blame it on them. :)  I went with a 'zebra skin' effect, and it took about 2 hours to paint it on.  I was using a good quality acrylic paint from a tube, but I honestly think a cheap craft paint would have been easier, just make sure it's gloss; a flat paint may flake off later.  My paint was too thick and had to be thinned with water, but if I added too much water it would start to run down the board.  I was completely over the whole thing by the time I was halfway done.   

Aaaaannnnd glue and twist and push,
aaaannnnd glue and twist and push...
Step 3.)  Trim it.  Seriously I stood in Wal-Mart for ten minutes with three different yarns and two spools of ribbon in the 'seat' of my cart trying to decide what I wanted to do.  There were fluffy yarns with crystals woven into them, fluffy and glittery, just fluffy, ribbon that was solid hot pink glitter, ribbon that was just pink and shiny...I had a really hard time deciding. I went with fluffy- there was 129 yards of it, so I knew I could use several strands along each side and make it nice and fuzzy.  If I had it to do over again, I would have went with the glittery ribbon, it would have been a lot easier to glue onto the edges.
I spent about 15 minutes cutting lengths of my fuzzy yarn, about 8 per edge, and then started in one corner hot gluing them on.  I didn't make one long length of glue, I did three spots on the short ends and 5 on the long ends (not counting the giant globs in the corners) and twisting the pieces of yarn so that even if one of the lengths didn't get stuck in one glue glob, it would get stuck in the next glob. (Don't you love these technical terms?)
This could be your fingers.  Don't
let this be your fingers.
Now, you're probably wondering where the spoon comes into play.  Hot glue is, well, hot.  Low-temp glue is hot, but it sets up almost immediately and you won't die if you get it on your fingers.  Not so for high-temp glue guns.   High-temp glue is like lava and stays hot for three or four minutes.  For this project a low-temp is fine, we're dropping glue then pressing in the yarn one spot at a time.  I used the back of a spoon to push the yarn pieces into the glue without burning my fingers....again.  Seriously, it hurts.  When you're done, trim your corners, and hang!